By Blissom · Updated 2026-10-23

How to use this page: read the question, work it on paper, then check the answer and the working under it. The numbers are the hand-bender values exams expect (30° uses a spacing multiplier of 2 and a conventional shrink allowance of 1/4" per inch of depth; take-up 5" on a 1/2" EMT Klein shoe); where the ideal trigonometry differs materially, the working says so.
Terms the exam asks you to define
Definition questions can be deceptively hard because several answers sound similar. Learn what each word measures.
The rise in a conduit bend is best described as the:
- a. horizontal distance from the point of bend, parallel with the deck
- b. leg length
- c. radius
- d. height of the stub-up
Answer: d. Height of the stub-up.
- Rise is the vertical leg: from the floor (or the run) to the end of the stub, measured to the back of the bend.
- The horizontal part is the run; the radius is the curve of the bend itself, set by the bender shoe.
___ is produced when bent conduit takes a shortcut by following the arc of the curve instead of following the straight distance into a corner.
- a. gain
- b. offset
- c. shrink
- d. take-up
Answer: a. Gain.
- Two straight legs meeting at a sharp corner are longer than the curved conduit that actually turns the corner. The difference is gain.
- For a 1/2" EMT 90 on a Klein 51606 (4-5/8" centerline radius) the centerline gain is 4.625 × (2 − π/2) = 1.985", about 2".
- Shrink is a different thing: how much an offset or saddle shortens the run, not the corner shortcut.
Take-up (deduct) is the amount you:
- a. add to an offset for shrink
- b. subtract from the stub height to find the arrow mark
- c. subtract from a back-to-back length for gain
- d. add to a saddle center mark
Answer: b. Subtract from the stub height to find the arrow mark.
- Take-up is how far the bend "takes up" conduit from the arrow to the back of the 90.
- Klein's guides: 1/2" EMT 5", 3/4" 6", 1" 8", 1-1/4" 11"; other makers can differ.
When bending an offset toward an obstruction, the shrink is:
- a. ignored
- b. subtracted from the measurement to the obstruction
- c. added to the measurement to the obstruction
- d. split between the two marks
Answer: c. Added to the measurement to the obstruction.
- The offset uses up conduit, so the bends have to sit farther out than the tape says.
- When you bend away from the obstruction (the offset starts at a fixed point), shrink does not move the marks.
Offsets and shrink
Distance between bends = depth × multiplier. Shrink = depth × shrink per inch. Multipliers: 10° = 6, 22.5° = 2.6, 30° = 2, 45° = 1.4, 60° = 1.2.
On an offset using 30° bends and a depth of 6 inches, the conduit shrink is:
- a. 3/4"
- b. 1"
- c. 1-1/2"
- d. 2-1/4"
Answer: c. 1-1/2".
- Shrink per inch at 30° is 1/4".
- 6 × 1/4" = 1-1/2". (Exact trig: 6 × tan 15° = 1.608", which is why exams ask for the bender value.)
- Distance between the bends: 6 × 2 = 12".
What is the shrink constant for a 45° bend?
- a. 1/16" per inch
- b. 3/16" per inch
- c. 1/4" per inch
- d. 3/8" per inch
Answer: d. 3/8" per inch of offset depth.
- Shrink per inch: 10° = 1/16", 22.5° = 3/16", 30° = 1/4", 45° = 3/8", 60° = 1/2".
- These are the conventional hand-bender shrink allowances from Klein's bending table, not tan(θ ÷ 2) rounded to the nearest sixteenth; the ideal geometric shrink per inch is tan(θ ÷ 2) (0.268 at 30°), which can differ materially.
A 4" offset is made with 45° bends. How far apart are the marks, and how much does it shrink?
Answer: 5-5/8" apart (5.6"), 1-1/2" of shrink.
- 4 × 1.4 = 5.6", about 5-5/8".
- 4 × 3/8" = 1-1/2" of shrink.
- These are conventional hand-bender values. Ideal trigonometry gives about 5.657" spacing and 1.657" shrink, so verify actual bends when close tolerances matter.
An offset needs a 5" centerline rise (clearance included) and must be complete 60" from the end of the conduit. With 30° bends, where do the two marks go?
Answer: First mark at 51-1/4", second at 61-1/4" from the end.
- Distance between bends: 5 × 2 = 10".
- Shrink: 5 × 1/4" = 1-1/4". Add it to the completion point: the second mark goes at 60 + 1-1/4 = 61-1/4".
- First bend is 10" before that: 61-1/4 − 10 = 51-1/4".
A box offset of 1/2" uses 10° bends. How far apart are the marks?
Answer: 3".
- The 10° multiplier is 6 (exact value 1 ÷ sin 10° = 5.76).
- 1/2 × 6 = 3".
A 3" offset is bent with 22.5° bends. How far apart are the bends, and what is the shrink?
Answer: 7-13/16" apart, 9/16" of shrink.
- 22.5° multiplier 2.6: 3 × 2.6 = 7.8", about 7-13/16".
- Shrink 3/16" per inch: 3 × 3/16" = 9/16".
An 8" offset has to be made in a short space with 60° bends. What are the distance between bends and the shrink?
Answer: 9-5/8" apart, 4" of shrink.
- 60° multiplier 1.2: 8 × 1.2 = 9.6", about 9-5/8".
- Shrink 1/2" per inch: 8 × 1/2" = 4". Steep offsets save space but cost a lot of conduit and pull harder.
- These are the conventional table values. Ideal trigonometry gives about 9-1/4" spacing (8 ÷ sin 60°) and 4-5/8" shrink (8 × tan 30°), so for tight clearances verify the actual bend before marking or cutting.
Saddles
A 3-point saddle with a 45° center has 22.5° outer bends, outer marks 2.5 × depth from the center, and the center mark moved 3/16" per inch of depth.
A 3-point saddle with a 45° center bend needs a 3" centerline rise, with the clearance over the pipe already included. How far from the center mark are the outer marks, and how far does the center mark move?
Answer: Outer marks 7-1/2" each side; center moves 9/16".
- Outer marks: 3 × 2.5 = 7-1/2" from the center mark.
- Center shift (shrink to the center): 3 × 3/16" = 9/16", added to the measurement to the center of the obstruction.
- Total shrink of the run is twice that: 1-1/8".
Which bender mark is used for the center bend of a 3-point saddle?
- a. arrow
- b. star point
- c. rim notch (teardrop)
- d. degree mark
Answer: c. The rim notch or teardrop, on benders that have one.
- The notch marks the middle of the bend, so the peak of the saddle lands on the center of the obstruction.
- The two outer bends use the arrow.
When should you use a 4-point saddle instead of a 3-point saddle?
Answer: When the obstruction needs an extended raised section between two offsets, such as a wide duct or a beam. There is no universal width cutoff: choose from the obstruction size, the clearance, the conduit size, the bend radius and the room available.
- A 4-point saddle is two offsets back to back: up, across the top, down.
- Each offset uses the normal multiplier and shrink, so the total shrink is twice an offset of the same depth.
A 4-point saddle uses a 4" nominal centerline rise with 30° bends. In this simplified hand-bender layout, the second mark is referenced to a point 40" from the starting end and the two inner marks are to be 12" apart. Using the conventional multiplier and shrink, where are the four marks?
Answer: 33", 41", 53" and 61" from the end.
- Each side is a 4" offset at 30°: bends 4 × 2 = 8" apart, shrink 4 × 1/4" = 1".
- Mark 2 goes at the 40" reference plus one offset's shrink: 40 + 1 = 41". Mark 1 is 8" before it: 33". These are nominal layout marks, not a guarantee of a 12" finished level clearance; for a real 12" obstruction, allow for the bender's bend geometry and verify the finished clearance.
- Across the 12" top: third bend at 41 + 12 = 53". Fourth bend 8" past that: 61".
- Total shrink of the saddle: 2 × 1" = 2".
A 3-point saddle with a 60° center bend needs a 2" centerline rise, clearance included. Outer mark distance and center shift?
Answer: Outer marks 4" each side; center moves 1/2".
- 60° center, 30° outer bends: multiplier 2.0, so 2 × 2 = 4" from the center mark.
- Center shift 1/4" per inch: 2 × 1/4" = 1/2". The bends total 120° toward the 360° limit.
90s, back-to-backs and cut lengths
Stub mark = stub height − take-up. Back-to-back: star on the full distance, or the arrow on the distance minus the take-up.
You need a 14" stub-up on 3/4" EMT. Where does the arrow go?
Answer: 8" from the end.
- 3/4" EMT take-up is 6".
- 14 − 6 = 8". Arrow on the mark, hook toward the end, bend to 90°.
A back-to-back 90 on 3/4" EMT must measure 36" outside to outside. Where is the second mark?
Answer: Star point on 36", or the arrow on 30", measured from the back of the first 90.
- Star method: bender reversed, star on the full 36".
- Arrow method: 36 − 6 (take-up) = 30", hook facing the first 90.
A piece of 1/2" EMT, bent on a Klein 51606 (4-5/8" centerline radius), needs a 10" stub and a 40" leg, both measured to the back of the 90. How long do you cut it?
Answer: About 47-5/16".
- Legs added: 10 + 40 = 50".
- Gain to the back of the 90: centerline gain 0.429 × 4.625 = 1.985", plus the OD 0.706" = 2.691".
- 50 − 2.691 = 47.31", about 47-5/16". A shoe with a different radius gives a different gain, so use the radius of your own shoe.
What is the developed length of a 90° bend with a 24" centerline radius?
Answer: 37-11/16".
- Developed length of a 90 = radius × π ÷ 2 = 1.571 × radius.
- 24 × 1.571 = 37.70", about 37-11/16".
A 20" stub is needed on 1" EMT. Where does the arrow go?
Answer: 12" from the end.
- 1" EMT take-up is 8".
- 20 − 8 = 12". The same 8" applies to 3/4" rigid bent on the 1" EMT shoe.
Which hand bender shoe is used for 1/2" rigid conduit, and what take-up do you use?
Answer: The 3/4" EMT shoe, with its 6" take-up.
- Rigid has a larger outside diameter than EMT of the same trade size (1/2" rigid is 0.840", 1/2" EMT is 0.706"), so it rides in the next EMT shoe up.
- Likewise 3/4" rigid uses the 1" EMT shoe (8") and 1" rigid uses the 1-1/4" EMT shoe (11").
Segmented 90s
Degrees per shot = 90 ÷ shots. On the exam, spacing between shots = developed length ÷ number of shots.
A 90° segmented bend with 15 shots and a developed length of 60 inches will have ___ between shots.
- a. 3"
- b. 4"
- c. 5"
- d. 6"
Answer: b. 4".
- 60 ÷ 15 = 4" between shots, 6° per shot (90 ÷ 15).
- Checked with idealized tangent-layout geometry: a 60" developed length is a 38.2" radius, and 2 × 38.2 × tan 3° = 4.004" between marks.
A 90° segmented bend with 12 shots and a developed length of 72 inches will have ___ between shots.
- a. 3"
- b. 4"
- c. 5"
- d. 6"
Answer: d. 6".
- 72 ÷ 12 = 6" between shots, 7.5° per shot.
- Exact: radius 45.8", 2 × 45.8 × tan 3.75° = 6.009".
A segmented 90 must have a 24" radius in 9 shots. How many degrees per shot and how far apart are the marks?
Answer: 10° per shot, marks 4-3/16" apart.
- 90 ÷ 9 = 10°.
- Spacing = 2 × 24 × tan 5° = 4.20", about 4-3/16". (Developed length ÷ shots gives 37.7 ÷ 9 = 4.19", the same answer.)
Kicks and rolling offsets
A kick is one bend: travel = rise × multiplier. A rolling offset moves over and up at once: true offset = √(horizontal² + vertical²).
A kick must rise 5" with a 30° bend. What is the travel?
Answer: 10".
- Travel = 5 × 2 = 10" along the conduit.
- Horizontal run = 10 × cos 30° = 8.66", about 8-11/16".
A kick rises 6" using a 22.5° bend. What is the travel along the conduit?
Answer: 15-5/8".
- Travel = rise × multiplier: 6 × 2.6 = 15.6", about 15-5/8".
- Horizontal run = 6 ÷ tan 22.5° = 14.49", about 14-1/2".
A rolling offset moves 9" horizontally and 12" vertically. What is the true offset, and the distance between 30° bends?
Answer: True offset 15"; bends 30" apart.
- √(9² + 12²) = √225 = 15".
- Bend it as a 15" offset: 15 × 2 = 30" between bends, shrink 15 × 1/4" = 3-3/4".
- The plane of the offset sits about 36.9° from vertical (atan2 of 9 and 12); make both bends in that one plane.
Code questions that come with bending
Bending exams usually include a few NEC questions on bends between pull points and conduit fill.
What is the maximum total of bends allowed between pull points?
- a. 180°
- b. 270°
- c. 360°
- d. 450°
Answer: c. 360° (for EMT, NEC 358.24).
- Count every bend: an offset at 30° uses 60°, a 3-point saddle at 45° uses 90°, a 90 uses 90°.
- Two 90s plus a 45° saddle plus a 30° offset is already 330°.
How many #12 THHN conductors are permitted in 3/4" EMT?
Answer: 16.
- 3/4" EMT internal area 0.533 in² × 40% = 0.2132 in².
- #12 THHN is 0.0133 in²: 0.2132 ÷ 0.0133 = 16.03, so 16.
How many #10 THHN conductors are permitted in 1" EMT?
Answer: 16.
- 1" EMT internal area 0.864 in² × 40% = 0.3456 in².
- #10 THHN is 0.0211 in²: 0.3456 ÷ 0.0211 = 16.4, so 16.
How many #12 THHN conductors are permitted in 1/2" EMT?
Answer: 9.
- 1/2" EMT internal area 0.304 in² × 40% = 0.1216 in².
- 0.1216 ÷ 0.0133 = 9.14, so 9. (#14 THHN: 12.)
A 4" square × 1-1/2" deep box (21.0 in³) has two 12-2 cables with ground, one receptacle and internal cable clamps. Is it within box fill?
Answer: Yes: 18.0 in³ needed, 21.0 in³ available.
- Insulated conductors: 2 cables × 2 = 4.
- Equipment grounds (up to four): 1. Receptacle (one yoke): 2. Internal clamps: 1. Total 8 allowances.
- 8 × 2.25 in³ (#12) = 18.0 in³, within the 21.0 in³ of the box (NEC 314.16).
Sources: NEC 2023 358.24(B) (360° limit; the 2026 NEC adds 300.24), Chapter 9 Table 2 (bend radius), Tables 1, 4 and 5 (conduit fill), 314.16 (box fill) and 310.15(C)(1) (ampacity adjustment); Klein Tools Conduit Bender Guide (stub take-up, offset multipliers and shrink, saddles). Method.
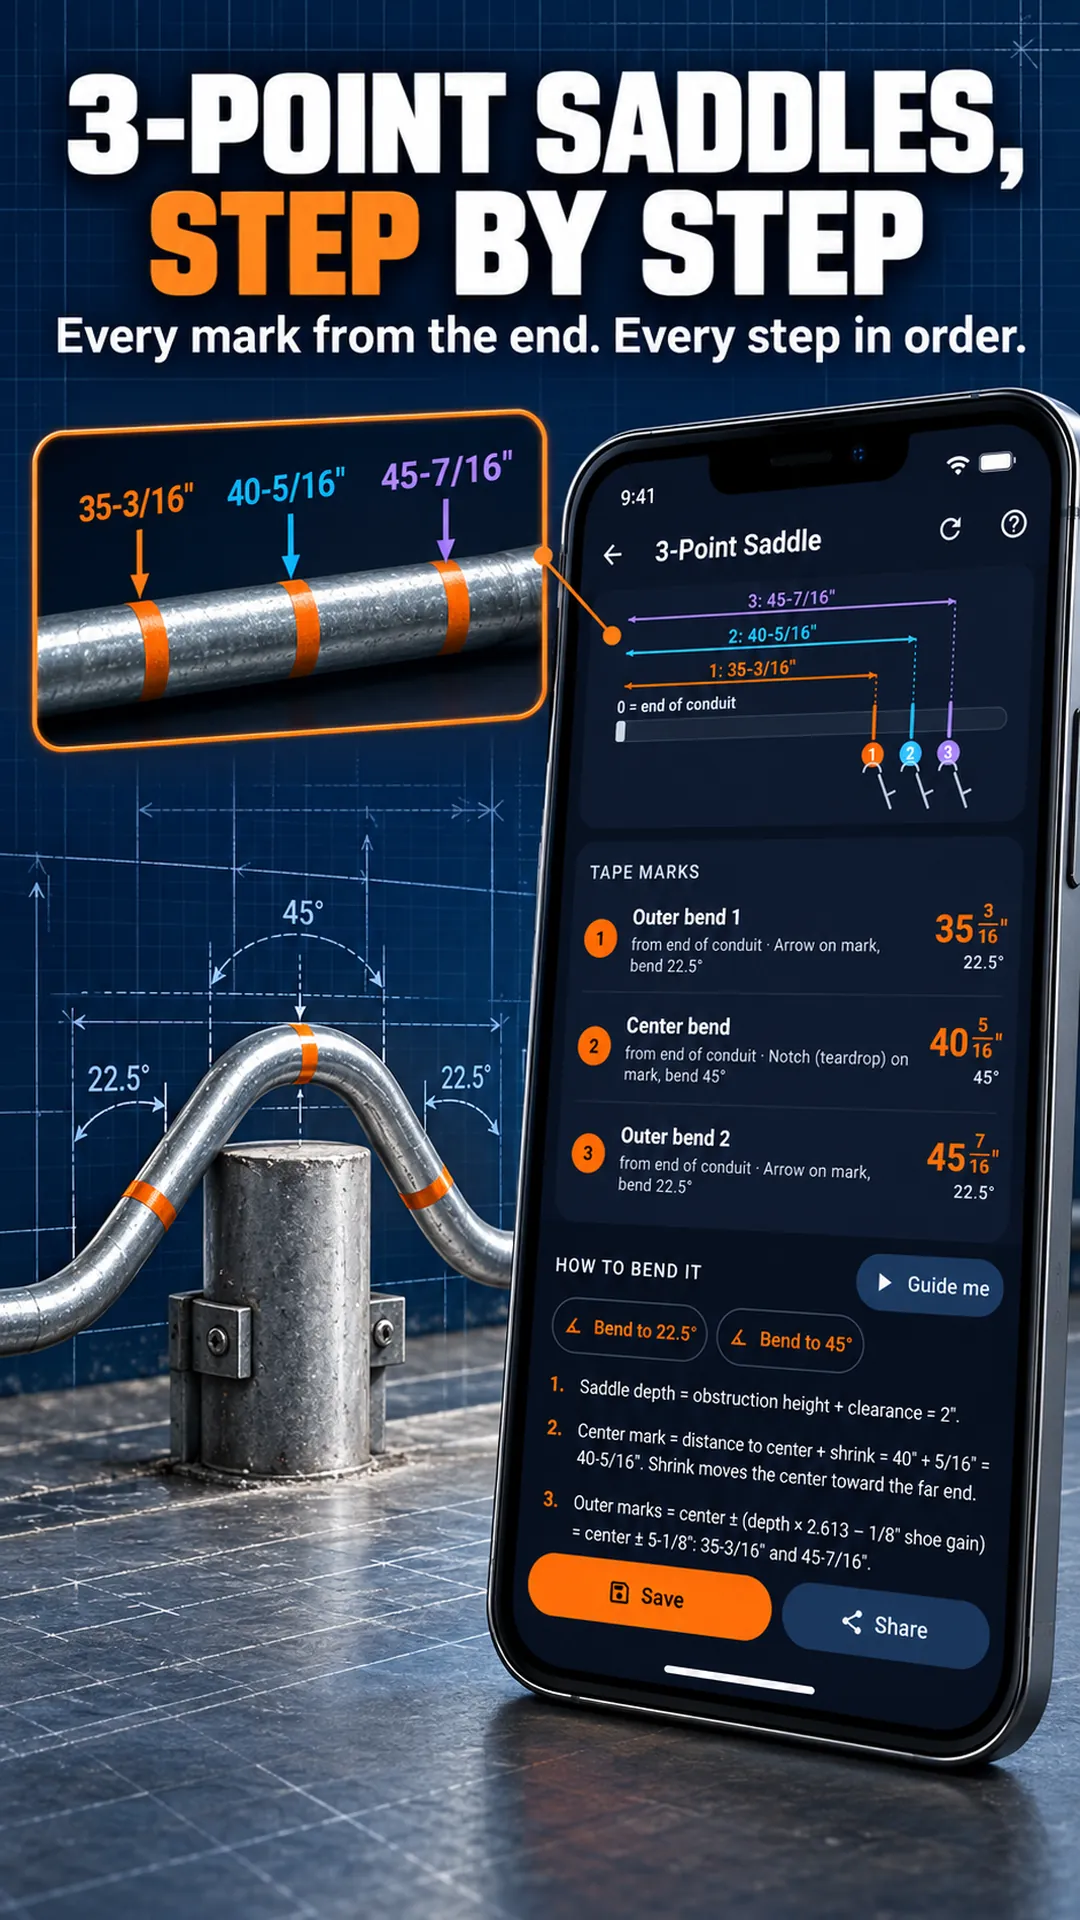
Check your hand math against the exact answer
- Every bend type on the exam, with the steps written out
- Guide mode walks through each bend on real pipe
- Sticker numbers or exact trig, side by side
- Offline in class and on site
Android only. There is no iPhone version yet; the free calculators on this site work on any phone.
$7.99 one time · no subscription · no ads · works offline